Getting Invisalign in Bangkok; My Invisalign Journey
Getting Invisalign in Bangkok was one of the best decisions of my life. I’ve hated my teeth for more than 15 years, I was too stubborn as a kid to listen to my mum and get braces so here I am at 32 years old in Bangkok, Thailand still regretting that decision. I’m nothing if I’m not pragmatic and while I’ve planned to fix my teeth for the last few years I haven’t been able to do it due to my journey to every country in the world, and full-time travelling 10 out of every 12 months – that meant I wouldn’t be at my ‘home’ in Bangkok every few months to get braces tightened, check-ups etc.
So now, with only 4 countries left in my quest, I can finally fix my teeth and get that Hollywood smile I’ve always wanted! I was completely open to either braces (train-tracks) or Invisalign (a see-thru retainer that you wear 22/24 hours per day, you change the retainer every 2 weeks, and over time your teeth are corrected), but I wasn’t keen on the idea of veneers as my teeth are healthy, albeit not straight. Quick fixes aren’t my style though, I want to be permanently fixed!
Table of contents
- Getting Invisalign in Bangkok; My Invisalign Journey
- CHOOSING MY INVISALIGN DENTIST IN BANGKOK
- STEP 1. Choosing my treatment. BRACES OR INVISALIGN?
- STEP 2. Record Taking
- STEP 3. Treatment Plan
- STEP 4. Installing your first Invisalign
- How Does Invisalign in Bangkok Work?
- Final Thoughts on getting Invisalign in Bangkok
CHOOSING MY INVISALIGN DENTIST IN BANGKOK
So finally I’m going to be in Bangkok enough to fix my issues. Next up was choosing a dentist. There are hundreds of dentists in Bangkok, but I wasn’t focusing on price, or sexy marketing. I just wanted the most trustworthy dentist, preferably trained overseas, who spoke good English and didn’t cost the world. After months and months of research (forums, phone calls, friends, everything!), I concluded there are 2 places that stand out as the best dentists in Bangkok – Thantakit International Dental Centre and a place in Thonglor, in central Bangkok. I had consultations with them both, and finally chose Thantakit as the guys who will be responsible in fixing my insecurities!
Why did I choose Thantakit Dental Centre?
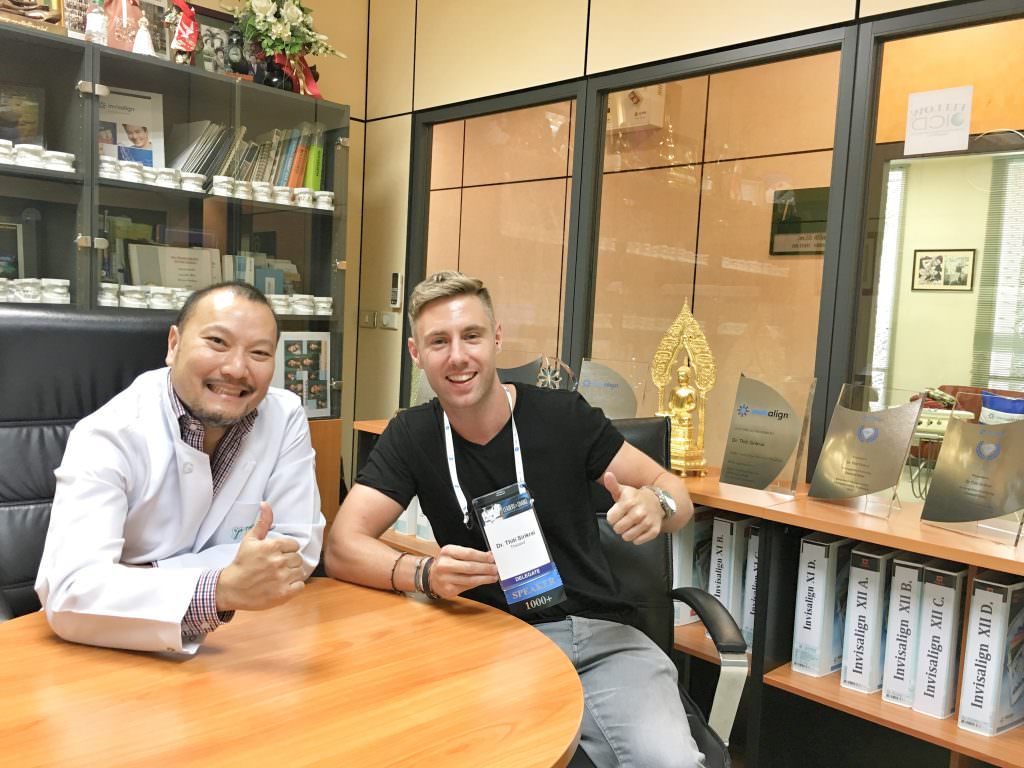
In the end, it was an easy choice. For a start, they have 2 locations, and 1 is on Petchaburi road, a really easy place to access from anywhere in Bangkok. Secondly, when I went for my consultation the place was really what I was hoping for. Clean, clinical but friendly with a coffee shop etc. I spoke to the nurses, who were friendly and spoke English and then finally, the bulk of the decision when I met my dentist Dr Thiti Sirikrai. This guy is a legend!
His English was perfect but more than that he was so friendly and really professional. He studied overseas (in both England and the US) so was super qualified. Not only that, he’s a huge traveler so we spent quite a bit of time swapping travel stories too! So it was time for the official consultation…
STEP 1. Choosing my treatment. BRACES OR INVISALIGN?
Dr Thiti explained everything about our options. Ceramic braces, metal braces, minor surgery, veneers, Invisalign, the lot. We spoke for quite a while. He was pretty honest which was what I needed, even if it hurt a bit. “This bit of your smile is great, this bit is awful” haha. Uncomfortable but exactly what I needed. Having someone inspecting your mouth critically when you hate your teeth is not fun. But finally, I’m doing something about it so it’s worth the awkwardness.
Anyway, after chatting for a while we decided Invisalign would be the best solution for me. It’s unnoticeable, I don’t have to come to the dentist every month (every 2/3 months is possible, brilliant!. It should fix me with no problems. That means I can still travel (yaaay!). I can record videos without looking too crazy. Also, if I’m doing any media stuff, I can pop out the Invisalign for 20 mins then pop it back in. This was step 1. Before we could confirm everything though we moved onto Step 2.
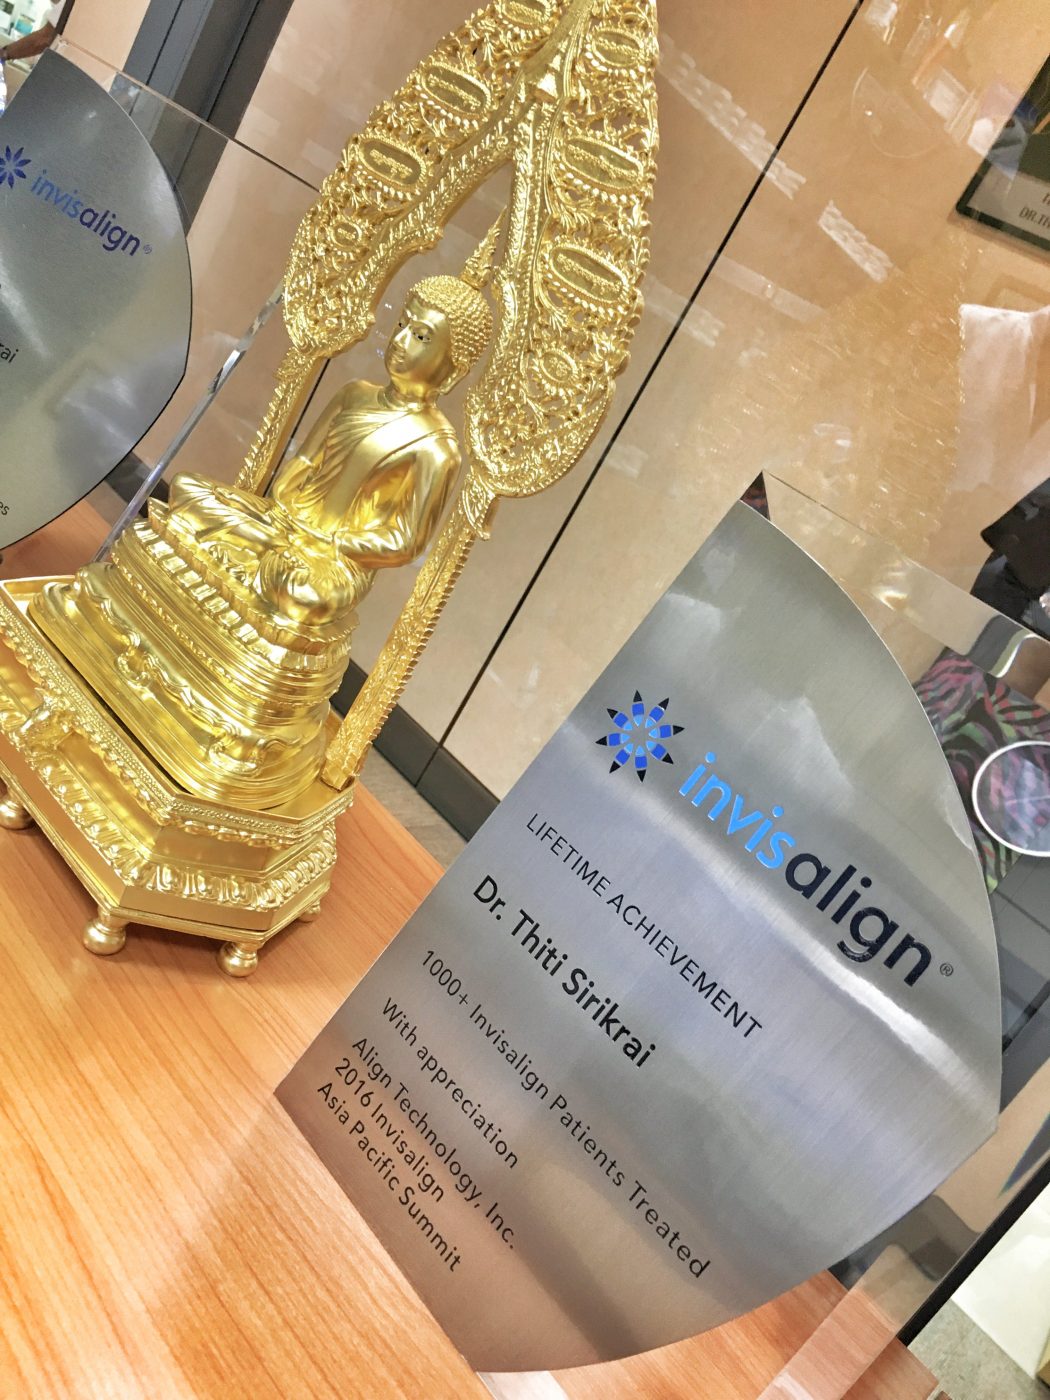
It turns out that Thantakit is THE Invisalign specialists in Thailand, having treated over 1000 people with them. Dr Thiti wasn’t available last week as he was keynoting an Invisalign conference in Hong Kong/Macau. When it’s something serious about your teeth and appearance, hearing this kinda thing made me so much happier and more confident about my choice. I wanted a genuine expert, and that’s what I now have!
Anyway, all this was step 1. Before we could confirm everything though we moved onto Step 2.
STEP 2. Record Taking
So we were going for Invisalign. Next up was pre-operative photos, x-rays, models made. Dentists seem to have come a long way since I was a kid in Ireland, all this stuff was done in the same building, I couldn’t believe it.
After that, it’s either an oral scan or silicone impression of your teeth. They take loads of pics of your teeth from every angle, smiling, not smiling, inside, outside. It’s horrible, to be honest. Close up of all your defects etc, eurrrrgh. Anyway, it takes about 20 minutes and it’s done thankfully. Personally, I also had a few chips and cavities filled in here too as I waited (amazing Thailand!), it’s easier to get everything up to speed before you go ahead with the braces/Invisalign because from then on you’re kinda stuck with something in your mouth. So I had a proper clean, polish etc and was ready to go.
So now the moulds were done, I was all good to go. From here, Dr Thiti sends all the in-depth information to Invisalign’s HQ in the US. The technology is INSANE. They work out various treatment options using hardcore computer software, but the results and options don’t come back for 2 weeks. So I’m off and free from the dentist for 2 more weeks until Step 3 is ready to go…
EDIT: If you’re getting Invisalign in Bangkok in Bangkok in 2020 or beyond, they now use a scanner machine for this process. No more horrible mould thing!
STEP 3. Treatment Plan
After you wait for the US to send all the information back to your dentist, you’re called in for another consultation. From here I sat down with Dr Thiti, swapped some more travel stories, then back to business!
This situation was really odd. I was chatting with the Doctor, but there was a huge screen with a CGI version of my teeth (which I hate remember!) right beside us. From here, the Doctor explains every problem and every solution. I had 3 options available to me for treatment, ranging from 42 weeks Invisalign, 64 weeks and over 100 weeks, and all those than with or without the rubber band in your mouth joining your two sets of teeth. This was a lot to take in!
Thankfully, the Doctor explained everything in depth. If I wanted my ‘midline’ to match up (the middle teeth lining up perfectly on the top and the bottom) then I should take the rubber band option (you can see in the video below). Also, if I want the mid-line to work, and for my jaw to sit a little more forward (where it should be!) I shouldn’t go for the 42-week option. Equally the 100week+ option would fix all the teeth in the back of my head first, for the first 60 weeks or so, and then in the last 40 weeks or so they’d attack my front teeth, the area I’m most self-conscious about.
The software is AMAZING, you can see exactly how the Invisalign will improve your smile, and it gave me goosebumps to see the final product, I honestly can’t imagine myself having straight teeth, yet here I am looking at them a year or so from now, on this computer software. So, so exciting!
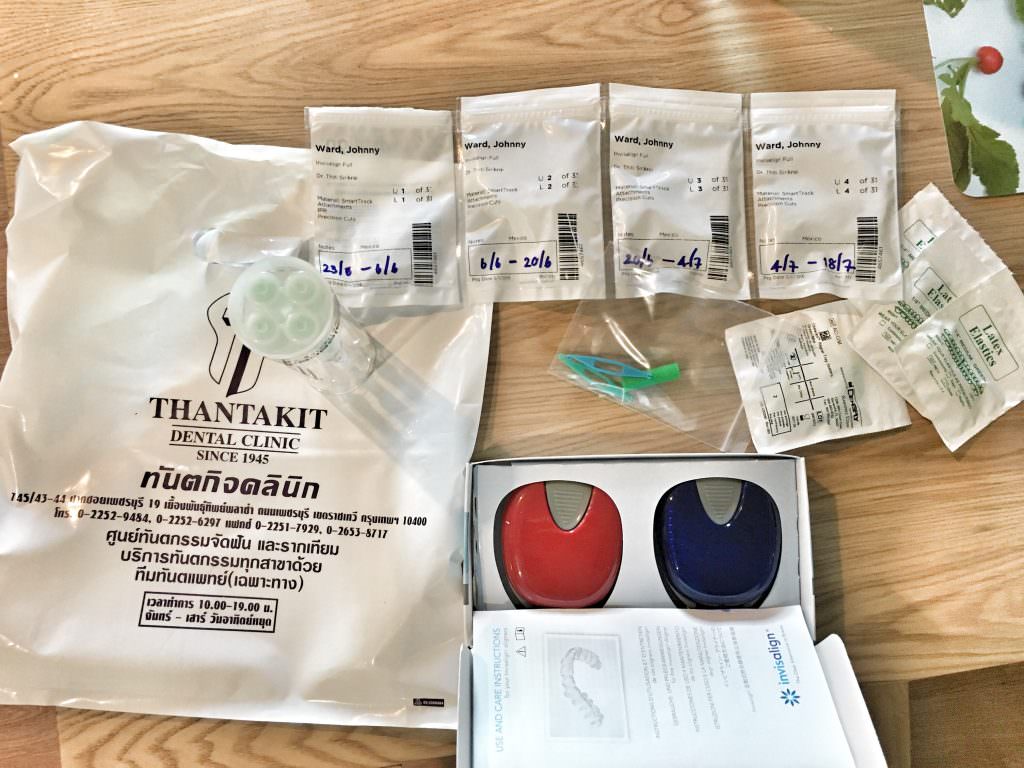
I was really impressed with my dentist’s honesty here. The longer option is more expensive and makes them more money but he was brilliant. He told me my teeth in the back functioned really well, and there was no ‘need’ to make them line up perfectly. If I only want the teeth that everyone can see to be perfect, and the midline to be straight, the middle option would be best. Done! Sounds great to me, so we went for that option. So from here, Thantakit sends my choice back to the USA again, and they create all the ‘trays’ (that’s what they call the see-thru retainers). This takes 3-4 weeks, until the final step – step 4.
STEP 4. Installing your first Invisalign
I waited for 3 weeks, got my call and went in yesterday to get my first tray fitted. It feels weird!
Getting invisalign in Bangkok, I love this dentist place, seriously. Nothing was too much bother, I had a million questions and ended up staying there for about 2.5 hours with questions and some minor treatments. First, you get one final cleaning, then they shave your teeth a few mm according to the software, to allow your teeth to straighten up and slot in straight together.
Also, here you get the ‘attachment bonding’. People don’t seem to blog about this stuff much, but the dentist has to attach 5-10 small white bumps semi-permanently to your teeth. When you put on your Invisalign, these then help with the force to push them to where they should be. This ‘bumps’ stay on your real teeth throughout treatment and then are removed once you’re all set with your Hugh Jackman smile!
You then get your first lesson how to put them in and take them out, again a very weird feeling. It doesn’t hurt at all, but you do feel some pressure in your mouth, a gentle squeeze and to be honest I loved the feeling. Feeling like your teeth are FINALLY getting shifted into straight lines is really nice.
Also, because they look/act like retainers, you can use some fluoride gel each evening with your Invisalign to whiten your teeth. A nice little bonus as you struggle through your journey! So here I am, on Day 2 with my Invisalign fitted. I’ll be blogging a lot more about it, and how it feels etc, but it’s a great start and I’m delighted with how everything has been so far! Thanks for reading!
How Does Invisalign in Bangkok Work?
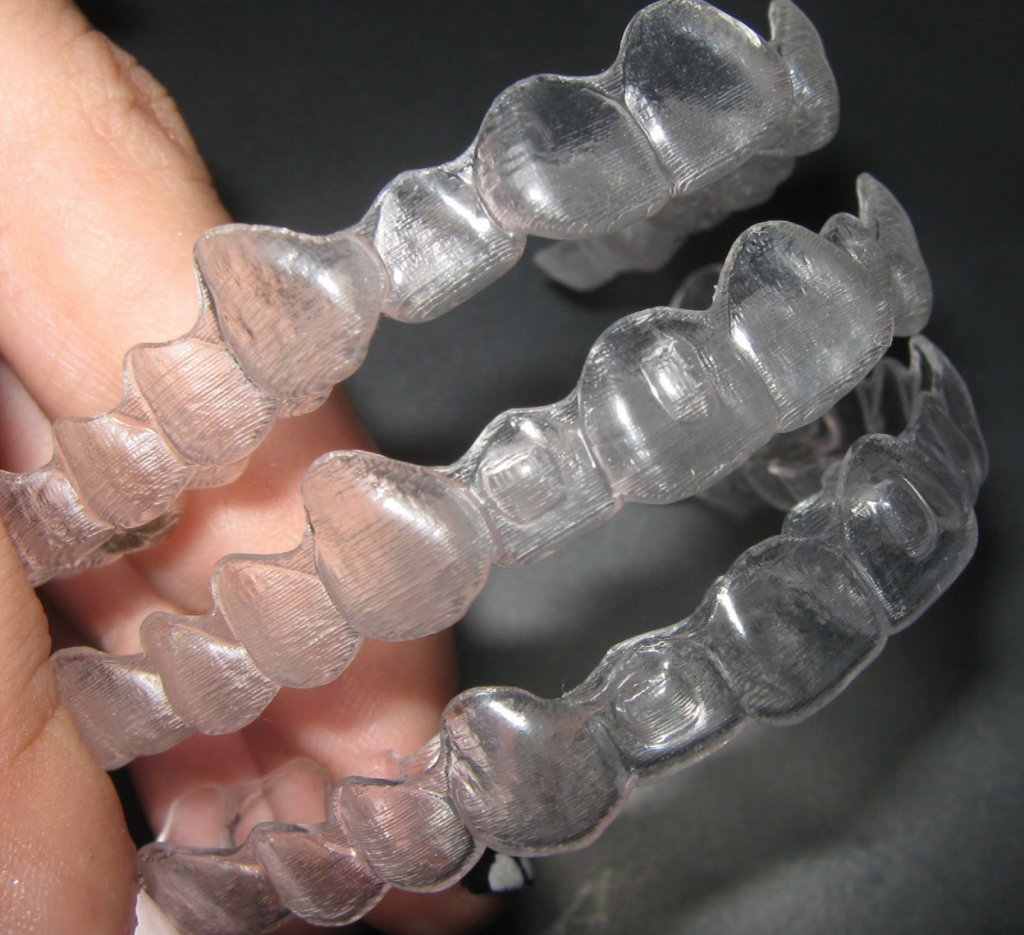
If you’ve never heard of Invisalign it’s essentially a see-thru version of braces. With braces, you get the permanent ‘train-tracks’ installed on your teeth for 1-2 years, and I thought I’d have to get the same thing, but with Invisalign you get ‘X’ amount of trays (retainers). You wear each tray for two weeks, but you wear it ALL day, only taking off to eat, brush and floss. You sleep with it on, drink with it on, everything. If you don’t wear it 22/24 hours, you extend your treatment by a week each time you forget! So you have to be disciplined!
It’s really easy to pop them on and off, I’ll show you guys in the next video. Thantakit now has my whole treatment of trays, all 31 sets (so that’s 2 weeks per tray, 62 weeks treatment!). They don’t give you the whole set. They generally seem to give you 4 sets (8 weeks) each time. So then if you’re disciplined, you come back after 8 weeks, have a check-up, and then get your next set. I’m only on Tray 1 at the moment but fingers crossed I’ll be back at the end of next month ready for my next set. Let’s do this!
Final Thoughts on getting Invisalign in Bangkok
Now, 3 years on, it was one of the best choices in my life. Ever. Honestly. Thantakit were amazing, my teeth look great. And if you’re reading this thinking that your teeth can never be great, I remember thinking the same thing. Now people constantly compliment my teeth. It’s crazy how much it’s changed. Take the plunge, Invisalign Bangkok is worth the investment, I promise.


Remember, never travel without travel insurance! And never overpay for travel insurance!
I use HeyMondo. You get INSTANT quotes. Super cheap, they actually pay out, AND they cover almost everywhere, where most insurance companies don't (even places like Central African Republic etc!). You can sign-up here. PS You even get 5% off if you use MY LINK! You can even sign up if you're already overseas and traveling, pretty cool.
Also, if you want to start a blog...I CAN HELP YOU!
Also, if you want to start a blog, and start to change your life, I'd love to help you! Email me on johnny@onestep4ward.com. In the meantime, check out my super easy blog post on how to start a travel blog in under 30 minutes, here! And if you just want to get cracking, use BlueHost at a discount, through me.
Also, (if you're like me, and awful with tech-stuff) email me and my team can get a blog up and running for you, designed and everything, for $699 - email johnny@onestep4ward.com to get started.
Do you work remotely? Are you a digital nomad/blogger etc? You need to be insured too.
I use SafetyWing for my digital nomad insurance. It covers me while I live overseas. It's just $10 a week, and it's amazing! No upfront fees, you just pay week by week, and you can sign up just for a week if you want, then switch it off and on whenever. You can read my review here, and you can sign-up here!


 As you know, blogging changed my life. I left Ireland broke, with no plan, with just a one-way ticket to Thailand and no money. Since then, I started a blog, then a digital media company, I’ve made more than $1,500,000 USD, bought 4 properties and visited (almost) every country in the world. And I did it all from my laptop as I travel the world and live my dream.