Narrating Documentaries with AI: How to Use CapCut’s Voice Generator Like a Pro
The soul of any documentary is voice narration; it brings the story to life, making it emotional, and helps the audience relate to the topic. However, when professional voice actors are either unavailable or not within the budget constraints, or when you are doing the production all alone, then CapCut Desktop comes to the rescue with its intelligent solution.
The AI voice generator in CapCut allows users to convert written text into a natural-sounding voiceover; creators can therefore create high-quality narration without costly equipment or outside talent. In this paper, we will guide you through the process of narrating the documentaries with the help of AI using the voice tools offered by CapCut as a master.
Table of contents
- Narrating Documentaries with AI: How to Use CapCut’s Voice Generator Like a Pro
- What Is Documentary Narration?
- Why Use AI for Documentary Narration?
- Benefits of CapCut AI Voice Generator for Documentaries
- How to Use CapCut’s Voice Generator Like a Pro, 5 Main Steps
- Best Practices for Using AI Voiceovers in Documentaries
- Final Thoughts
What Is Documentary Narration?
Documentary narration is the talking or voice-over that leads the images in a film documentary. It mainly serves as a guide to the audience, puts the Afghan film into context, and makes it clear and effective when delivering the message of filmmaker. The good narration gives emotional weight, clarifies complex notions, and keeps the narrative flow, in particular, in those scenes when there is no interview or dialogue.
The forms of narration can be:
Expository: Informative, factual, neutral, or authoritative.
Poetic/ Reflective: Personal, artistic, and emotional.
Interactive: The person giving the narration can talk directly to viewers or can become part of the tale.
High-quality documentary narration can be rendered using voice tools by AI, such as text-to-speech AI in CapCut, so small-time creators, educators, and journalists can now deliver high-quality narration without having to go to a professional recording studio.
Why Use AI for Documentary Narration?
Using AI to narrate a documentary is perfect when time is of the essence, especially when it comes to having a lean production company or an educator or content maker who does not want to lower the quality of his/her work. The reason why it works is this:
Affordable: Eliminate voiceover recording sessions and freelancers’ costs.
Stable performance: AI presenters provide consistency in tone and speed of talking.
Multi-language support: Let your story be heard in different languages and sound like a native speaker.
Quicker output: Have your script ready to use as a narration in a matter of minutes.
CapCut’s text to speech AI feature is a game-changer for documentary makers working on tight timelines and budgets.
Benefits of CapCut AI Voice Generator for Documentaries
The voice generator provided by CapCut has a few benefits as far as professional narration is concerned:
Diverse Voice Options: You can select either male or female, or child voice in a different attitude, calm, serious, warm, etc.
Customization: Adjust the pace and pitch according to the mood of your documentary.
Seamless Timeline Integration: Voiceovers are generated right into your edit timeline.
Free to Use: The subscription and licensing fees are not needed to get access to the high-quality results.
Perfect for Multiple Scenes: The type of voice is perfectly allocated to different parts of the speech (e.g., narration, quotes, facts).
These characteristics reduce the use of CapCut AI voice generator to a convenience rather than a mighty narrating tool.
How to Use CapCut’s Voice Generator Like a Pro, 5 Main Steps
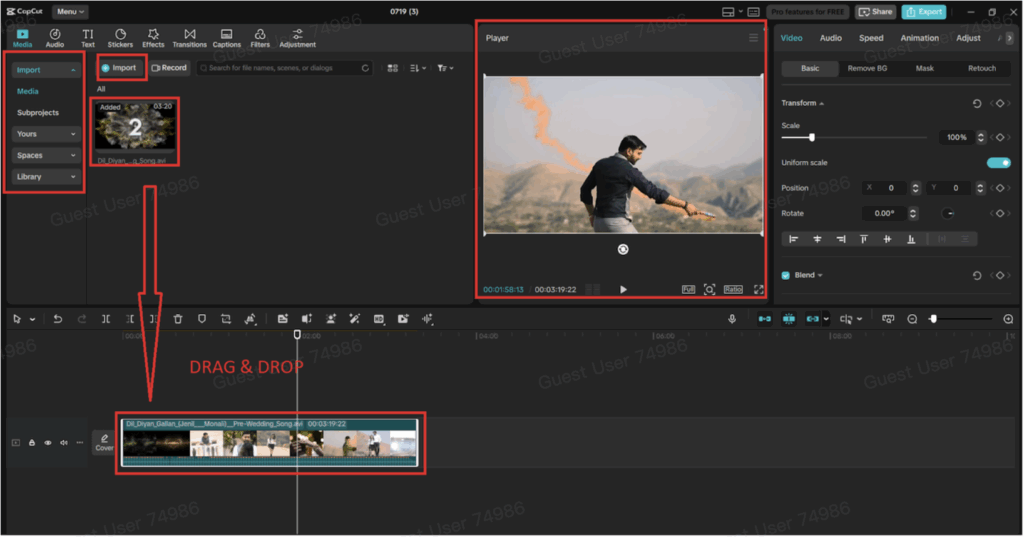
Step 1: Import Visual Assets and Create a New Project
Use Open CapCut Desktop or go to “New project”. To import your documentary visuals, videos, images, drone shots, and archival footage, it is done through the left panel’s “Import” button.
Put the visuals in the timeline by dragging and placing them in the order in which you want to display and then add the narration.
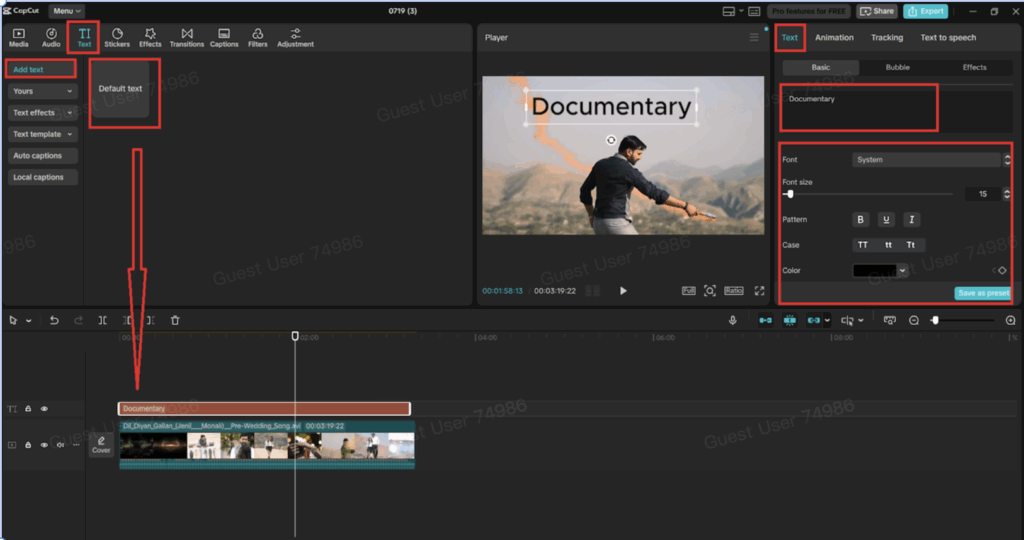
Step 2: Write or Import Your Documentary Script
Compile an attractive and easy-to-read script that serves to supplement your visuals. Repeat it and cut it into scenes or sections. Open the “Text” tab in CapCut and paste your narration line by line after clicking the “Default text” button.
Divide subtitle-length scripts into small chunks of text to maintain a good timing and pacing of the voice-overs with the on-screen action.
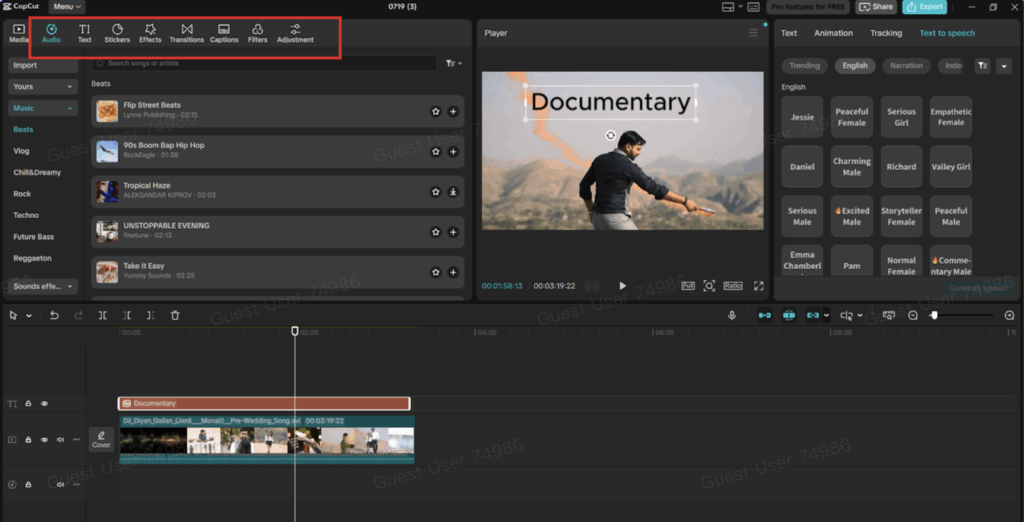
Step 3: Use Text-to-Speech to Generate AI Narration
Click on a “Text” box, then “Text to speech” in the top toolbar. CapCut will present the voice capabilities- select the one that best suits your documentary tone. Before generating, you can preview each of them.
After you have chosen the voice you want, you need to press “Generate speech”. CapCut will place the voice over on the timeline. Trim it to your footage.
It is voiceover AI that comes inbuilt, which is ideal in documentaries since it is professional and polished, and no mic is needed at all.

Step 4: Add Subtle Music, Transitions, and Visual Enhancements
Go to the “Audio” tab to provide background music, to further the ambience, or to evoke emotions. Ensure that the music is not too loud so that it does more overpower the narration. Transitions between clips allow a smoother switch between scenes, and Filters or Effects enable you to select an aesthetic compatible with your documentary.
You can use the AI video upscaler of CapCut, as well, to improve the quality of older or lower-quality images to get a cleaner result, specifically helpful with historic video.
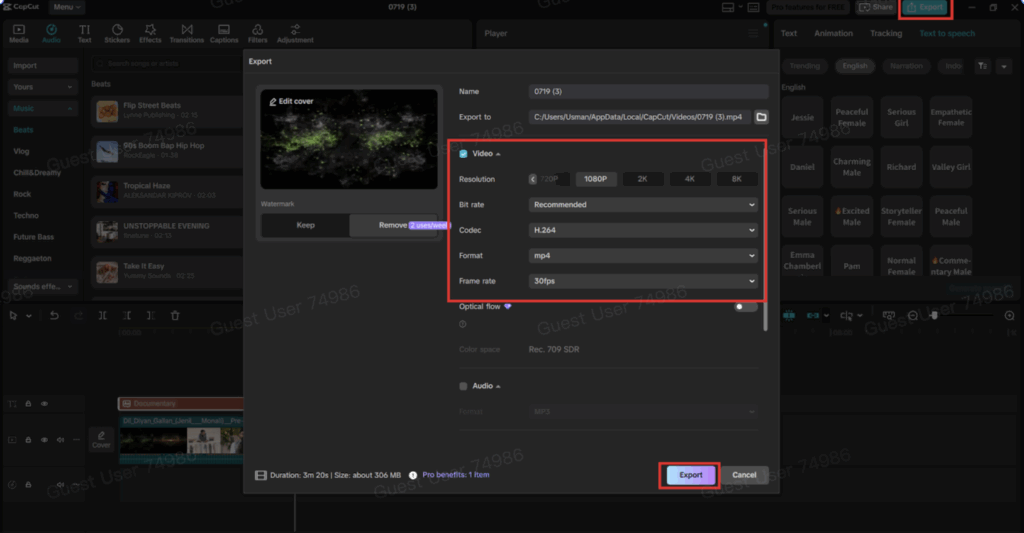
Step 5: Final Polish and Export
Test play your timeline and make sure that voiceovers are properly fitted to the visual flow. Match up any audio (voice over music) where necessary. After ensuring everything is all right, export at the upper-right corner. The resolution should be high (1080p or 4K) and the format (MP4 preferably).
Your presented documentary is YouTube, Vimeo, college, or film festival-ready.
Best Practices for Using AI Voiceovers in Documentaries
Use Emotional Tone: Choose the voice tones that evoke the proper tone: investigative articles should sound serious, human stories, warm.
Segment by Scene: Create a story narration by Holly with a better pace and regulation.
Pair with Visual Cues: Match voiceovers with important visuals to boost audience interactions.
Translate for Global Reach: CapCut is multilingual-based, meaning that you can translate your videos as well as create narration to reach the audience across continents.
Final Thoughts
It is not only possible to create documentaries with AI using Capcut’s voice generator, but it is also professional, speedy, and budget-friendly. CapCut gives you the power to make your story shine with its simple-to-navigate timeline and AI voice generator, which helps you narrate it with cinematic quality, paired with other creative tools such as the AI video upscaler.
Despite the historical overview, you might be filming science stories, travel diaries, or social impact documentaries, you can edit them up with narrated content using CapCut AI features to create compelling content records without a studio.
Remember, never travel without travel insurance! And never overpay for travel insurance!
I use HeyMondo. You get INSTANT quotes. Super cheap, they actually pay out, AND they cover almost everywhere, where most insurance companies don't (even places like Central African Republic etc!). You can sign-up here. PS You even get 5% off if you use MY LINK! You can even sign up if you're already overseas and traveling, pretty cool.
Also, if you want to start a blog...I CAN HELP YOU!
Also, if you want to start a blog, and start to change your life, I'd love to help you! Email me on johnny@onestep4ward.com. In the meantime, check out my super easy blog post on how to start a travel blog in under 30 minutes, here! And if you just want to get cracking, use BlueHost at a discount, through me.
Also, (if you're like me, and awful with tech-stuff) email me and my team can get a blog up and running for you, designed and everything, for $699 - email johnny@onestep4ward.com to get started.
Do you work remotely? Are you a digital nomad/blogger etc? You need to be insured too.
I use SafetyWing for my digital nomad insurance. It covers me while I live overseas. It's just $10 a week, and it's amazing! No upfront fees, you just pay week by week, and you can sign up just for a week if you want, then switch it off and on whenever. You can read my review here, and you can sign-up here!


 As you know, blogging changed my life. I left Ireland broke, with no plan, with just a one-way ticket to Thailand
and no money. Since then, I started a blog, then a digital media company, I've made
more than $1,500,000 USD, bought 4 properties and visited (almost) every country in the world. And I did it all from my laptop as I
travel the world and live my dream. I talk about how I did it, and how you can do it too, in my COMPLETELY FREE
Ebook, all 20,000
words or so. Just finish the process by putting in your email below and I'll mail it right out to you immediately. No spam ever too, I promise!
As you know, blogging changed my life. I left Ireland broke, with no plan, with just a one-way ticket to Thailand
and no money. Since then, I started a blog, then a digital media company, I've made
more than $1,500,000 USD, bought 4 properties and visited (almost) every country in the world. And I did it all from my laptop as I
travel the world and live my dream. I talk about how I did it, and how you can do it too, in my COMPLETELY FREE
Ebook, all 20,000
words or so. Just finish the process by putting in your email below and I'll mail it right out to you immediately. No spam ever too, I promise!