How to Pose for Vacation Photos
If you plan a vacation and want to return with more than just great experiences, this guide is for you. We gathered 14 vacation pose ideas, from simple, timeless options to creative, dynamic shots, to help you look natural, avoid stiff photos, and capture moments you will want to relive again and again. Whether you head to the beach, city, or hike in the mountains, these vacation photo ideas will help you take pictures you will be proud to share.
Table of contents
- How to Pose for Vacation Photos
- Why the Right Pose Matters for Vacation Photos
- 14 Best Vacation Poses to Elevate Your Travel Photos
- 1. Turn Away From the Camera
- 2. Adjust Your Hair
- 3. Twirl in a Flowy Outfit
- 4. Walk Toward the Camera
- 6. Look Down and Away
- 7. Sit Naturally
- 8. Skirt or Scarf Flip
- 9. Sit Out of a Car Window
- 10. Interact With Surroundings
- 11. Hair Flip
- 12. Lean for The View
- 13. Look Away While in Motion
- 14. Step Into a Reflection
- FAQ
- Last Tips Before Your Trip
Why the Right Pose Matters for Vacation Photos
A vacation photo can capture more than scenery. The angle of your body, the tilt of your head, or a glance toward the horizon can show confidence, curiosity, or excitement. The right pose helps connect the subject with the setting, so the image feels intentional rather than random.
Poses also remove the awkward pause in front of the lens. Instead of a frozen stance or hidden hands, you can hold a prop, adjust a hat, or point toward a detail in the scene. With a small set of go-to poses, you can step into any frame ready to create a shot that feels alive and worth keeping.
14 Best Vacation Poses to Elevate Your Travel Photos
If you want to know how to pose for vacation photos that stand out, the ideas below work in almost any location. From beach escapes to historic cities, these vacation poses keep your shots natural and memorable.
1. Turn Away From the Camera

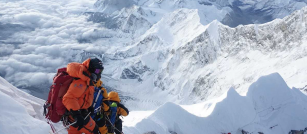
Face the scenery instead of the lens. This classic option ranks high among vacation pose ideas because it shifts attention to the background while still showing your presence in the frame. It works best at mountain lookouts, seaside cliffs, or rooftop terraces with wide views.
Tip: Raise your arms a little or hold a hat to give the silhouette more shape and depth.
2. Adjust Your Hair
A small movement of the hand toward your hair can change the entire mood of a photo. It draws attention to the face, softens the posture, and creates a moment that feels real rather than staged. On a breezy beach, the gesture can show the wind’s effect without overemphasis. In a quiet city street, it can give the impression of a pause before you continue your walk.
This pose works when you want to show a calm, thoughtful side or avoid a fixed, direct gaze at the camera. It also pairs well with sunglasses, loose waves, or a hat in hand.
Tip: Keep your head slightly turned toward the main light source so your features stay clear and shadows remain gentle.
3. Twirl in a Flowy Outfit

A quick turn with a skirt, dress, or loose shirt can add motion that makes the frame look more dynamic. The fabric spreads out and creates lines that break a flat background. This approach works well in open spaces such as plazas, boardwalks, or wide trails where nothing blocks the movement.
Choose clothes with light material so the shape appears clear in the shot. Keep the turn steady to avoid awkward folds or blurred outlines.
Tip: If you’re shooting on an iPhone, take a lot of photos – motion changes fast, and snapping 20-30 frames increases your odds of getting that perfect shot. After the photoshoot, you can use an app like Clever Cleaner: iPhone Cleanup App to quickly sort through your shots, remove near-duplicates, and free up space without scrolling through everything manually. There are more cleaning apps for iPhone than ever now, so the days of tedious photo-by-photo cleanup are behind us.
4. Walk Toward the Camera

A slow step forward adds life to the frame without blur. Keep your shoulders loose, chin slightly down, and eyes off-center for a candid feel. This works on sidewalks, boardwalks, hotel corridors, or any path that creates natural lines toward the lens.
Tip: Use burst mode for a short sequence, then pick the best frame. Before a trip, clear space so the phone does not stop mid-shot.
5. Use a Local Prop

An object from the location can instantly show the place and add character to the photo. A fresh croissant in Paris, a straw hat in Bali, or a bouquet from a street market tells more about the trip than a caption ever could. The prop adds detail, gives your hands a role, and can serve as a conversation starter when you share the image.
Choose items that fit naturally with the scene and do not overpower the frame. Keep them positioned so your face and the main background elements remain visible.
Tip: Pick a light, easy-to-hold item from the location and keep it slightly off-center to avoid blocking your face or the background.
6. Look Down and Away
Direct your gaze toward a spot on the ground a few steps ahead or slightly to the side. This removes the direct connection with the lens and gives the frame a calm, thoughtful tone. It works well in busy streets, garden paths, or open terraces where the background still frames your profile.
Avoid tilts that push the chin too far toward the chest, as this can shorten the neck and distort proportions. Keep your posture upright and shoulders open so the pose remains confident.
Tip: Fix your eyes on a point about two to three meters ahead to keep the head position natural and the neck line smooth.
7. Sit Naturally
Choose a seat such as a bench, step, or low wall and position yourself so the camera captures you from a slight angle. Keep your back straight with one leg bent more than the other to create balance and shape. Place an elbow on your knee for support, but keep your hand loose instead of clenched.
This pose works well in parks, plazas, or outdoor cafés where the surroundings add context to the shot. The mix of structure and ease makes it one of the most versatile vacation photo ideas for both city and nature settings.
Tip: Keep your hands relaxed and imagine holding a fragile object to avoid stiff, tense fingers.
8. Skirt or Scarf Flip

Lift a section of your skirt, dress, or scarf and move it to one side. The fabric forms curves and lines that add depth to the frame and break up a static pose. This works in markets, gardens, or coastal paths where light and color pass through the material.
Select light fabrics that react well to a short, sharp motion without loss of shape. Stand where the wind or a quick hand move can create a clear outline against the background.
Tip: Hold the fabric high enough to show its flow without blocking your face or covering key details in the scene.
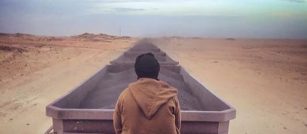
9. Sit Out of a Car Window
Position yourself so your upper body extends from the car window while the vehicle remains still. This pose gives an instant road trip feel and works well with scenic backgrounds such as coastal highways, mountain roads, or desert stretches. Keep your grip secure on the window frame for stability and safety.
Choose a background with clear lines or a recognizable landmark to make the location obvious. A hat, sunglasses, or a drink in hand can add extra detail without crowding the frame.
Tip: Park the car in a safe spot away from traffic and frame the shot to include both you and the view behind.
10. Interact With Surroundings

Make physical contact with an element in the scene to link yourself to the location. Touch a market stall, lean on a railing, rest a hand on a café table, or reach toward a flower in a garden. This approach adds context and makes the image feel more connected to the place.
Pick details that stand out and tell something about the destination, colorful tiles, textured walls, or local crafts. Keep your posture open so the interaction looks natural rather than forced.
Tip: Choose one clear focal point in the environment and direct your attention toward it to guide the viewer’s eye.
11. Hair Flip

Move your head to one side so your hair sweeps through the air. This creates motion and adds energy to the shot, especially in open spaces or near water, where wind can enhance the effect. Short hair can still work; the head movement alone gives a sense of action.
This pose suits beach scenes, lakesides, or rooftops where there is enough space around you. Keep the motion smooth to avoid awkward angles and make sure the light falls on your face during the movement.
Tip: Time the head turn so the hair reaches its peak in mid-frame, with your face slightly toward the light for clarity.
12. Lean for The View

Shift your body weight toward a railing, wall, or ledge to create a visual line from you to the scenery. This draws the viewer’s eye toward the background while keeping you as part of the frame. It works well on balconies, viewpoints, or bridges with a clear horizon.
Keep your posture balanced so the lean appears natural, not strained. Position your feet firmly and allow the upper body to angle just enough to suggest interest in the scene.
Tip: Stand close enough to the edge to capture the depth of the view without losing safe footing.
13. Look Away While in Motion

Walk at a steady pace and direct your eyes toward a point outside the frame. This creates a candid, unposed impression while still giving structure to the shot. The pose works on promenades, narrow alleys, or park paths that provide depth and clear lines.
Keep your stride natural with arms loose at your sides. Avoid large steps that may distort posture or blur the frame.
Tip: Turn your face toward the main light so the features stay visible and evenly lit.
14. Step Into a Reflection
Stand in a spot where water, glass, or polished stone reflects both you and the surroundings. Position your body so both you and the reflection fit neatly into the frame, which creates natural symmetry. This pose works well for vacation poses ideas, especially at lakesides, city streets after rain, or modern buildings with large glass panels.
Shift your weight slightly or tilt your head to break perfect symmetry and keep the shot dynamic.
Tip: Visit the spot during softer light, early morning, or late afternoon to avoid glare and capture more detail in both the main scene and the reflection.
FAQ
How can I look natural in vacation photos?
Avoid rigid posture and perfectly symmetrical stances. Instead, shift your weight, point your toes at an angle, or slightly tuck one shoulder back to add depth and keep the frame relaxed. Allure advises facing the camera at a three-quarter angle and holding a clutch or bag in front to elongate the silhouette.
When should I schedule my photo-ready moments?
Late afternoon or early evening offers warm, soft light that gives flattering tones and gentle shadows. Midday sun often produces harsh contrasts, so use shaded areas or change the angle to reduce them.
How can I make vacation poses feel authentic?
Shift your weight to one leg, point your toes at a slight angle, or lean against something for support. A National Geographic photographer in Business Insider notes that unexpected angles and foreground layers, such as rocks or foliage, help phone shots appear more dynamic. Travelers on r/photography also note that contact with the environment through a light lean or a simple hand position removes tension and makes the frame feel more natural.
How do I choose vacation poses that fit my style?
Decide whether you prefer a relaxed, candid look or a more structured, fashion-style approach. Review past photos to see which angles suit you best. Use those as a base and adapt them to each location by including elements from the surroundings.
Last Tips Before Your Trip
Good vacation photos rely on more than a nice location. Treat each shot as a short story: decide what you want the viewer to notice first, then arrange your body, face, and background to make that detail clear. Stand where the light falls evenly across your face, avoid clutter behind you, and use elements from the scene, a railing, a street sign, or a local snack, to create context.
Before the trip, make a short list of poses you like and test them at home in front of a mirror or phone camera. This saves time on location and reduces awkward pauses. When possible, ask a friend to take several frames in quick succession so you can choose the most natural one. If you travel alone, learn to use a tripod or place your phone on a stable surface and trigger the shutter with a timer or remote.
Most importantly, highlight moments that reflect your best vacation poses, ideas, and inspire new vacation picture ideas you will want to remember. A genuine laugh at a café table or a glance toward a market stall often holds more value than a perfectly symmetrical pose.
Remember, never travel without travel insurance! And never overpay for travel insurance!
I use HeyMondo. You get INSTANT quotes. Super cheap, they actually pay out, AND they cover almost everywhere, where most insurance companies don't (even places like Central African Republic etc!). You can sign-up here. PS You even get 5% off if you use MY LINK! You can even sign up if you're already overseas and traveling, pretty cool.
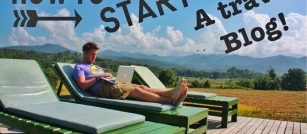
Also, if you want to start a blog...I CAN HELP YOU!
Also, if you want to start a blog, and start to change your life, I'd love to help you! Email me on johnny@onestep4ward.com. In the meantime, check out my super easy blog post on how to start a travel blog in under 30 minutes, here! And if you just want to get cracking, use BlueHost at a discount, through me.
Also, (if you're like me, and awful with tech-stuff) email me and my team can get a blog up and running for you, designed and everything, for $699 - email johnny@onestep4ward.com to get started.
Do you work remotely? Are you a digital nomad/blogger etc? You need to be insured too.
I use SafetyWing for my digital nomad insurance. It covers me while I live overseas. It's just $10 a week, and it's amazing! No upfront fees, you just pay week by week, and you can sign up just for a week if you want, then switch it off and on whenever. You can read my review here, and you can sign-up here!


 As you know, blogging changed my life. I left Ireland broke, with no plan, with just a one-way ticket to Thailand
and no money. Since then, I started a blog, then a digital media company, I've made
more than $1,500,000 USD, bought 4 properties and visited (almost) every country in the world. And I did it all from my laptop as I
travel the world and live my dream. I talk about how I did it, and how you can do it too, in my COMPLETELY FREE
Ebook, all 20,000
words or so. Just finish the process by putting in your email below and I'll mail it right out to you immediately. No spam ever too, I promise!
As you know, blogging changed my life. I left Ireland broke, with no plan, with just a one-way ticket to Thailand
and no money. Since then, I started a blog, then a digital media company, I've made
more than $1,500,000 USD, bought 4 properties and visited (almost) every country in the world. And I did it all from my laptop as I
travel the world and live my dream. I talk about how I did it, and how you can do it too, in my COMPLETELY FREE
Ebook, all 20,000
words or so. Just finish the process by putting in your email below and I'll mail it right out to you immediately. No spam ever too, I promise!