


How to Choose a Realistic Minecraft Shader
Realistic shaders can turn a blocky valley into a convincing landscape. Light spills through leaves, clouds gain depth, and water reflects the sky. The cost is heavier GPU work and occasional visual clutter. If you are asking what is the best minecraft shader, start with the experience you want rather than the loudest screenshots.
Table of contents
Define Realism Before Comparing Packs
Realism means different things. One player wants accurate sunlight. Another cares about reflective water or soft indoor shadows. A builder may prefer neutral colors that preserve block choices. A survival player needs clear caves and readable ores.
Iris describes itself as a shader mod that stays mostly compatible with OptiFine packs. It also bundles Sodium for optimized rendering. That makes it a useful starting point for current Java setups, though every pack still needs version checks.
The best shader pack for minecraft should handle your common scenes. Test rain, sunrise, the Nether, and a torch-lit room. A pack that shines outdoors can become muddy underground.
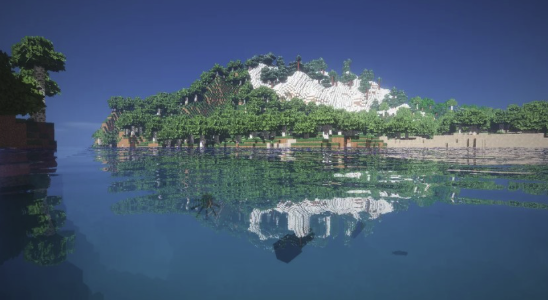
Focus on these features:
1. Shadow quality and stability while moving.
2. Water reflections that do not hide underwater blocks.
3. Exposure that keeps interiors playable.
4. Fog that adds depth without erasing landmarks.
5. Presets that scale from smooth play to screenshots.
Balance Image Quality Against GPU Load
Shader performance depends on resolution, render distance, pack design, and graphics hardware. Two computers with the same GPU can behave differently if one renders at 4K. Measure frame time, not only the highest frame-rate number.
Frame time reveals uneven motion that an average can hide. A steady 60 frames per second often feels better than a counter bouncing between 45 and 110. Set a realistic target for your display, then leave some headroom for rain, particles, and crowded bases.
| Feature | Realistic effect | First adjustment when slow |
|---|---|---|
| High-res shadows | Crisp sunlight edges | Drop one resolution step |
| Volumetric fog | Depth and atmosphere | Reduce quality or samples |
| Screen reflections | Shiny water surfaces | Limit reflection options |
| Contact shadows | Fine local depth | Disable before core shadows |
The best realistic shaders for minecraft usually expose these controls. Use a medium preset, play for ten minutes, then adjust. Sudden stutters matter more than a small average-frame-rate difference.
Large communities face another performance layer. A guide to minecraft hosting for large player groups can help administrators judge CPU, backups, and network quality. Shader calculations remain client-side, while the server tracks the world and players.
Build a Repeatable Test Instead of Chasing Hype
Create a small benchmark world. Include moving water, dense leaves, mobs, glass, and a dark interior. Lock the time and weather before each run. Keep the same render distance.
Change only one option between runs and write down the result. That sounds fussy, but it saves time. Random changes can produce a prettier image without showing which setting caused the slowdown. Keep the original preset nearby so recovery takes one click.
When testing what is the best minecraft shader for your machine, note three things: average smoothness, worst stutter, and visual readability. Screenshots cannot reveal how a pack feels during fast movement.
Hosting research such as this minecraft server host experience is useful when the same world also runs heavy plugins or mods. Keep that decision separate from graphics tuning.
Choose the Pack You Will Leave Enabled
The best shader pack for minecraft is not necessarily the most realistic option. It is the one that looks convincing during normal play and remains stable in difficult scenes. Keep two presets: a smooth daily profile and a richer capture profile. The best realistic shaders for minecraft reward small adjustments. Test patiently, protect visibility, and choose consistent motion over one spectacular frame.
Remember, never travel without travel insurance! And never overpay for travel insurance!
I use HeyMondo. You get INSTANT quotes. Super cheap, they actually pay out, AND they cover almost everywhere, where most insurance companies don't (even places like Central African Republic etc!). You can sign-up here. PS You even get 5% off if you use MY LINK! You can even sign up if you're already overseas and traveling, pretty cool.
Also, if you want to start a blog...I CAN HELP YOU!
Also, if you want to start a blog, and start to change your life, I'd love to help you! Email me on johnny@onestep4ward.com. In the meantime, check out my super easy blog post on how to start a travel blog in under 30 minutes, here! And if you just want to get cracking, use BlueHost at a discount, through me.
Also, (if you're like me, and awful with tech-stuff) email me and my team can get a blog up and running for you, designed and everything, for $699 - email johnny@onestep4ward.com to get started.
Do you work remotely? Are you a digital nomad/blogger etc? You need to be insured too.
I use SafetyWing for my digital nomad insurance. It covers me while I live overseas. It's just $10 a week, and it's amazing! No upfront fees, you just pay week by week, and you can sign up just for a week if you want, then switch it off and on whenever. You can read my review here, and you can sign-up here!





 As you know, blogging changed my life. I left Ireland broke, with no plan, with just a one-way ticket to Thailand
and no money. Since then, I started a blog, then a digital media company, I've made
more than $1,500,000 USD, bought 4 properties and visited (almost) every country in the world. And I did it all from my laptop as I
travel the world and live my dream. I talk about how I did it, and how you can do it too, in my COMPLETELY FREE
Ebook, all 20,000
words or so. Just finish the process by putting in your email below and I'll mail it right out to you immediately. No spam ever too, I promise!
As you know, blogging changed my life. I left Ireland broke, with no plan, with just a one-way ticket to Thailand
and no money. Since then, I started a blog, then a digital media company, I've made
more than $1,500,000 USD, bought 4 properties and visited (almost) every country in the world. And I did it all from my laptop as I
travel the world and live my dream. I talk about how I did it, and how you can do it too, in my COMPLETELY FREE
Ebook, all 20,000
words or so. Just finish the process by putting in your email below and I'll mail it right out to you immediately. No spam ever too, I promise!